


Camera Support - MU Series
Below is information for your MU/MD/MW series camera. For help with your MA/MC/MT or HD1080 camera, you can click HERE .
Welcome to your MU/MD/MW Series camera Driver and software installation for Windows. All three series use the same software. Regardless of the series you choose between these three, the same downloads will generate for you.
You should have received a disc with your camera. HOWEVER... if you did not, or if your PC/laptop doesn't have a CD-Rom, you can go to the following URL and download them:
http://www.amscope.com/software-download
Select the appropriate camera series on the left drop down menu, under "Select Camera". After you pick your camera series in the left drop down menu, select Windows under "Select Operating System". If you're not sure what model camera you have, it will say on the camera. For example, MD500, MU1803, or MW1000.

You’ll need to install the DirectShow and Twain drivers, and then most recent ToupView software.See below.

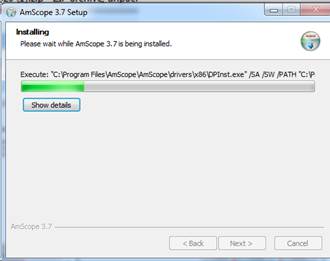
As you click each driver, it will download and once complete, prompt you to install:


After you complete the installation for each driver, do the same for the software.

Below, double click the .exe file (shown) to initiate the setup.

Follow the prompts to install the software.


The process will walk you through the rest of the installation and install the program which you can find in your Programs folder from the Start menu or on your desktop. Start Menu
A desktop icon will also be created.
Once you’ve finished the installation and click “Finish”, the software will open. Next… you need a camera!
MU SERIES: Your MU camera needs to be assembled before use. The main components are going to be your reduction lens, the body of the camera, and your USB 2.0 (WHITE) /3.0 (BLUE) cord (depends on which version you purchased).

*IMPORTANT* Make sure you remove all lens covers from the reduction lens AND the camera body.
 << Camera Body....... Reduction lens SKU: RU050 (FMA050 on sticker) >>
When people experience a black screen on the live preview screen, and the camera model is clearly recognized, it’s because of two possible reasons. Either 1. There’s a lens cap that was missed and needs to be removed. Or 2. The silver shutter pin is not engaged.
 Some assembly required.
 No lens caps on? PERFECT!
 Shutter pin “IN”
  Shutter pin “OUT” (example on SM series stereo microscope)
MD SERIES CAMERA:
For the MD series camera, there is no reduction lens to screw on. The camera will also come with 2 adapters. For the 23mm port of a trinocular microscope, or any binocular microscopes where the eye pieces are 23mm, you will not need these adapters.
 MD200 with adapters and cabel.
 MD200 inside 23.2mm to 30.5mm adapter or MD200 inside 23.2mm to 30mm adapter
For ocular ports that are larger than 23mm (either 30mm or 30.5mm), you will insert the camera into the proper adapter and then insert into the ocular port, shown below:
 Empty port of T720
  MD200 being put into 23.2-30.5mm adapter
 MD200 installed in ocular port using 23.2mm-30mm adapter
Next, plug in the small end or the USB cord into the camera. The end of the USB cord is shape-specific and will match the port of the camera. See below.

Now that you have your MU/MD/MW camera assembled and the software installed..... plug in camera and open software.
 Your camera should be recognized if you’ve correctly installed the driver’s and software. (model # will vary)
Click on the “MU900” (or whatever your model is) under the Camera List category and it will generate your preview of the specimen (ours is a fly below).

Once you see the preview, adjust your focus. In this case, we're using a stereo microscope (SM model). Start with the lowest setting on the magnification knob (0.7X) and place the microscope objectives 4-6” above the specimen (if no Barlow lens is used). If you're using a compound microscope, start with the lowest objective, usually a 4x.
 0.7X is the lowest magnification on SM series microscope head and usually the easiest place to start getting your specimen in focus.
What about a “Barlow” lens?
The Barlow (or auxiliary) lens is an additional lens that’s optional and screws on under the objective housing (bottom of the black cone). A 2X will double the magnification. For instance, a 10x eye piece with the 4X magnification will give you a 40X magnification. The 2X Barlow will double it and make it 80X. A 0.5X will cut it in half, and make it 20X. The 2x will reduce your working distance drastically (see below). The 0.5X Barlow will give you approximately 6” of working distance and increase your field of view ( the area of space you can see, so you can see more of your specimen).
 The 2X is the Barlow lens mentioned above and gives us the super close-up shots of my friend on the glass.
 The “SNAP” button does exactly what it sounds like. Snaps a picture of whatever your preview is showing.
The “RECORD” option will actually record a video of what you’re looking at or working on.
Below, you’ll see that after clicking SNAP, a new tab was opened. This will open and show you the picture you just took. In order to get back to your Live preview, click the ugly mustard yellow colored tab that says “Video [MU900]”. There are two drop downs. One is for the live preview. The other is for the quality of the picture you’re going to take. You can adjust as needed. You can take a sharp looking preview and reduce the resolution of the actual picture, or vice versa; you can drop the preview resolution and still end up with a sharp picture file.

After you click back to the live view (click Video [MU900] tab), you may notice the White Balance is off. Take the specimen away, turn the light intensity up, and place a white piece of paper under the objectives. Next, click the White Balance button.

The image should change and the color should be closer to the real color of your specimen. Look at the picture above, to the right versus the same exact thing after fixing the white balance (below).


You may notice that your object (our fly) is facing one way and the image show it facing the opposite way. Under the “FLIP” section of the menu, click the option that suits your purposes. In this case, to show identically to what my specimen is (versus the pictures above facing right), I selected “Horizontal” to show the true direction which would be the head on the left side of the frame.

CALIBRATION: Are you Measuring? If you want to measure, you’ll need to calibrate for each magnification. The video tutorial is posted on YouTube.com and can be found at https://www.youtube.com/watch?v=Z8652DG249E (highly recommended). Select the Unit of Measure from the drop down.

 Make your selection.
 Select your magnification.
Pick your window view magnification as well.  c
c
Pick how you’d like to measure your specimen: 
Under Options, Measurement, and then Object, you can define the color and line type to measure with.

Your preview will show the measurement. 
If you wish to save the image with measurement(s), select Layer and then Export to Image

To save, click the blue disc icon and the software will create your image in a new tab. From here, you will enter a name for your image file with your measurement.

If there’s anything you’d like to see that we missed, or you’d like to see more of, please email us at info@amscope.com or send a message through the CONTACT US link and we’ll try to be as accommodating as possible.
Thank you, and enjoy!