


HOW TO USE A PROPERLY USE A MICROSCOPE
Basics
1. When transporting the microscope, carry it close to your body with one hand on the arm and the other on the base. If you are unsure what part of the microscope is which, I recommend starting at our Microscope Parts & Functions section, found here.
2. Once you have removed the dust cover from the microscope if using one, and have plugged the microscope in, arrange the excess cord in a manner that will prevent you from tripping on it and knocking the microscope over. A microscope is a precision instrument, so any sharp movements or impact can set the fine elements of the unit off.
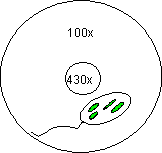
3. As a general rule, always start and end with the lowest power objective on the microscope (usually 4X), as it is easiest to focus and center the sample in the image on a lower power. Also, since it is the shortest objective lens, there is the least chance of scratching the lens when situating or removing the slide from the microscope. The below image shows how to properly mount the sample onto your slide.

4. Turn on the microscope and place the slide on the microscope stage with the specimen directly over the circle of light. Doing this will give you a 90% chance of finding the specimen as soon as you look through the eyepiece. If your microscope is monocular (it has only one eyepiece), close or cover your other eye for accuracy and comfort when viewing. If your microscope is binocular, adjust the interpupillary distance (the distance between the eyepieces) by either sliding or rotating the eyepieces (called adjusting the diopter if present on the microscope) appropriately until you can see only one circle of light with both eyes open.
NOTE: If you wear glasses, take them off; if you see only your eyelashes, move closer. If your microscope comes with high-eye point eyepieces (like those of our SM and ZM stereo zoom microscopes), you do not need to take off your glasses.
5. If you are on the lowest magnification level, focus the image by first turning the coarse focus knob. If you can’t get it at all into focus using the coarse knob, then switch to the fine focus knob.
6. Adjust the diaphragm as you look through the eyepiece. You will begin to notice that more detail is visible when you allow in less light. Too much light tends to give the specimen a washed-out appearance.
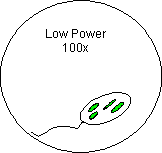
7. Once you have focused the specimen on low power (usually a 4X objective), center the specimen in your field of view, then, without changing the focus knobs, switch it to a higher magnification objective (10X objective, then 40X objective). If you don’t center the specimen you will lose it when you switch to higher powers.
8. Once you have it on a higher power magnification, remember to only use the fine focus knob to bring the image into focus. This, if present, is typically the smaller knob on the microscope, and will move the stage a much shorter distance than the coarse focusing knob. Since the higher power objectives are very close to the slide, using the coarse focus knob can scratch the lens and crack the slide.
9. Use the 100X objective with extreme care. As it is an oil immersion lens, using it without the oil to lubricate the lens can destroy the lens and provide an unclear image of your sample. Place one drop of oil between the coverslip of the slide and the objective lens. You may slowly add more until the oil fills the air gap between the objective lens and the slide. The oil will also help gather enough light to actually see through the lens and to prevent distortion of the image.
For more detailed information on how to use your oil immersion lens, feel free to email us here requesting a manual for the technique. You can also find some instructions in video form on YouTube by searching for "Oil Immersion Microscopy" or something similar.
Making a Wet Mount
1. Gather a thin slice/piece of your specimen. If your specimen is too thick, the coverslip will not be level and will wobble on top of the sample. The below image is an example of an incorrect mounting of the cover slip that will make focusing on the sample difficult.

2. Place ONE drop of water directly over the specimen. Too much water over the specimen will cause the coverslip will float on top of the water, causing the specimen to float in and out of your field of view.
3. Place the coverslip at approximately a 45 degree angle to the slide with one edge touching the water drop. Let go and allow the coverslip to fall onto the specimen.

Staining a Slide (After Making a Wet Mount)
1. Place one drop of Methylene Blue (or other stain, sold separately from another vendor) on one edge of the coverslip, and place the flat edge of a piece of paper towel on the other edge.
2. As the paper towel draws the water out from under the coverslip on one side, the flow of liquid will draw the stain in under the coverslip from the other side.

3. As soon as the stain has covered the area containing the specimen, you are done. The stain does not need to be under the entire coverslip. If the stain does not cover the desired area, repeat the process with a new piece of paper towel and more stain.
4. Be sure to wipe off the excess stain with a paper towel, so you don’t end up permanently staining the objective lenses.
5. Now you are ready to place the slide on the microscope stage. Be sure to follow all previous instructions on how to property operate a microscope.
6. Be sure to wash and dry both the slide and the coverslip after use.
If you still have more questions after reviewing this page, please call us at (888) 950-2888 and someone at our company can assist you, or send us an email here.
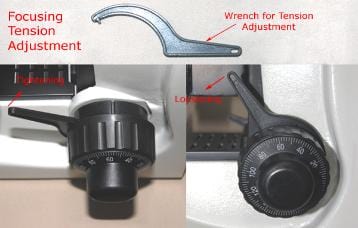
Adjusting Focusing Tension
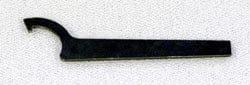
Basic (B100, M500 Style) Compound Microscope: Use the tool below, which comes with most microscopes, to adjust the focusing tension according to the picture to the right.
Stereo Zoom (SM & ZM) Microscopes: On most SM and ZM microscopes, the tension system is located on the focusing rack rather than the head. The focusing rack's dual knobs need to be rotated in opposite directions to increase or decrease the tension in the system.
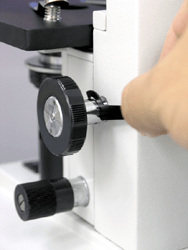
Advanced (600 & 800 Series) Compound Microscopes: There are two different styles on our advanced models. For the 680 & 800 series models, Use the wrench below to loosen or tighten the focusing tension.
For the other compound microscope models (490 & up), there is a ring on the inner section of the right hand focusing knob. This ring can be turned by hand to increase or decrease the tension.
Changing the Eyepiece (M Series Microscope)
There is a small screw on the side of the eye tube. Use a tiny screw driver (typically 1mm precision screwdriver size) to remove the screw so that you can take the eyepiece out and insert a new one. If you need to turn the microscope upside down for any reason, make sure to tighten this screw, or remove the eyepiece first to prevent accidental damage.
Color Filter Installation
Put the color filter in the swing-out ring holder if present on the microscope. Typically this style is found on models with an Abbe condenser and adjustable iris. If the swing holder is facing the body of the microscope, simply rotate the entire condenser assembly until it swings to the front.

Note: Microscopes with a disc style iris condenser typically do not have a filter holder. In this case, the filter may simply be placed and centered on the base illuminating lens or cover of the microscope.
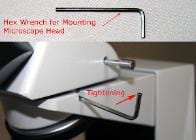
600 or 680 Series Microscope Head Installation
Use the hex wrench to loosen or tighten the locking screw.
New Eyeguard for Stereo Microscopes
The new eye-guard is foldable. This allows you to block ambient light from hitting your eyepieces when using a stereo microscope, preventing any double images or other viewing issues.